This week we are taking a look at a brilliant WordPress plugin called MaxButtons Pro which is made by Max Foundry. MaxButtons Pro is a CSS3 button generator plugin for WordPress, it’s easy to use and allows you to easily create you own buttons. You can also purchase pre-made button packs from the MaxButton Pro website, there are 98 button packs with 2084 buttons in total to choose from. The pre-made button packs definitely make it easier, you just create a button from one of the button templates then modify it to do what you want.
MaxButtons Pro Installation
First you will need to get a copy of MaxButtons Pro plugin, it’s only $15 on the MaxButton Pro website. Once you download the plugin, unzip it then upload it to your wp-content/plugins directory in your WordPress website. Then you can go to the Plugins section in WordPress and activate MaxButtons Pro. Once activated navigate to the Buttons menu tab that has now appeared in the left navigation on your WordPress admin. Then go to the tab called License and enter your license key, this can be found in your MaxButtons pro account.
Importing Button Packs
You can get a number of different groups of pre-made button packs from the MaxButtons pro website, either all of them for $99 or 10 packs for $25. There are also a handful of packs that are free, and you can get individual packs for $5 each. There really are button packs to suit many needs, plenty of slick looking call to action buttons and social media icons that will be useful for your WordPress website.
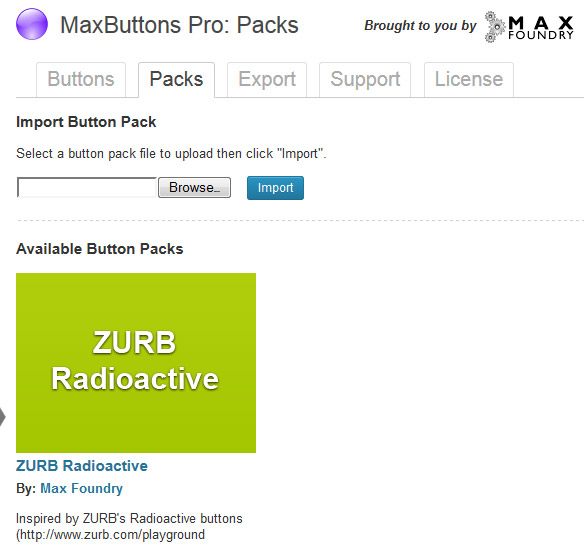
Once you purchase and download your new button packs, simply navigate to the Packs tab in the admin and Browse to the zip file of your button pack and then click Import. Once the button pack has been imported it will then show up in the Packs section, you can just click on it to enter the pack and choose the button you would like to use.

Creating Buttons with MaxButton Pro
You can create your own custom CSS3 buttons from scratch using MaxButtons Pro. Just go to the Buttons menu tab then click Add New to start creating your new button. You need to give your button a name and description, and a URL that the button will link to. It’s also easy to set the width and height of the button to whatever you need.
You get a hovering window that shows you exactly how the button you are creating will look as shown below. This makes it very easy to get a good result fast as you can see each change appear as you alter the buttons settings. There is even a colour swatch on this hover window that allows you to test the button on a different coloured background to see if it works.

Be default the buttons come with two lines of text you can use, a larger more bold one then some smaller text under that. Both lines of text are totally configurable so you can make the font size, style, weight, colour or alignment anything you want.
You can also upload an image icon of your choice and position it on your new button. It can be placed either the the left or right of the text, or above or below it.
All aspects of a buttons border can be controlled in the Border section. You can get some very nice effects using a combination of the Radius and Shadow properties.
Each button has two colour modes, Normal and Hover which are self explanatory. You have controls for the 2 different colours used in the gradient on each of the button states. You can also edit the text shadow, border and border shadow in this section.
After going over all of these settings to customise your button you then just need to hit Save. Once you have saved your button you are then provided with a custom shortcode which you can then use to put an instance of your button into one of your WordPress pages or posts.
Creating Buttons using Button packs
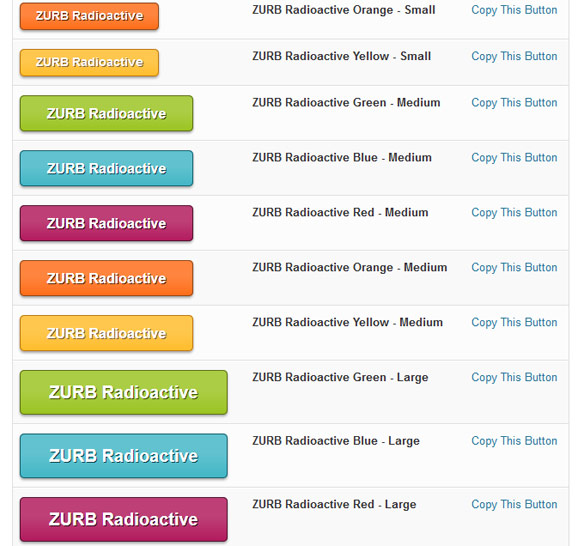
Creating new buttons using the MaxButton Pro button packs is far quicker than building your own from scratch and definitely recommended. Simply go to the Packs tab in your MaxButtons Pro admin then click on the button pack you wish to make a button from. We are quite fond of the Zurb Radioactive button pack, it’s a nice free pack that will let you create some nice looking call to action buttons. See below some of the default button sizes and styles you can choose from in the Zurb pack
To use one of these buttons you simply click on Copy This Button which creates a new instance of that particular button which you can then modify to suit your needs. All of the same customisation parameters are available as mentioned earlier for creating a button from scratch. Again once you have edited the button just save it then you will get your shortcode which you can use to insert it into your WordPress blog posts.
Exporting Button Packs
You can create your own custom button pack zip file using the built in Export feature in MaxButtons Pro. Basically you can make a selection of multiple buttons you have created and or customised yourself, then give your pack a name, description & author and hit Export Buttons. This will give you a zip file you can download to your computer.
We can see this feature being very handy for if you run another or many WordPress sites and you need access to the same set of buttons for those sites too. You could just export the common buttons you need then import directly into your other sites like a normal add on button pack.
Support
There is a Support tab within the plugin which informs you that all support is handled via the Support Forums here. You need to login to your MaxButtons account to be able to view and use the Support forums.
Conclusion
We have been using MaxButtons Pro plugin on another WordPress website we run for quite some time and we are definitely happy with the quick results it gives. If you want professional looking CSS3 call to action and social media buttons for your WordPress website, look no further.


Leave a Reply
You must be logged in to post a comment.